

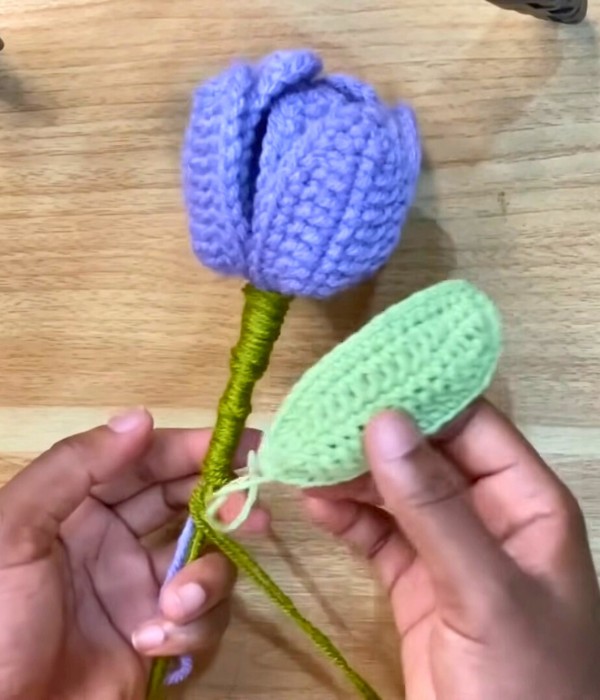
Crochet captures the soft beauty of nature in cozy, tangible forms, and the crochet tulip flower is a perfect example of this crafty magic. They are completed with bendable leaves, long stems, and petals that can be closed or opened according to your preference, allowing you to style the tulip in a vase, as a decoration, or even as part of a larger floral arrangement. You can even customize the colors to match any season or decor, making each tulip uniquely yours.
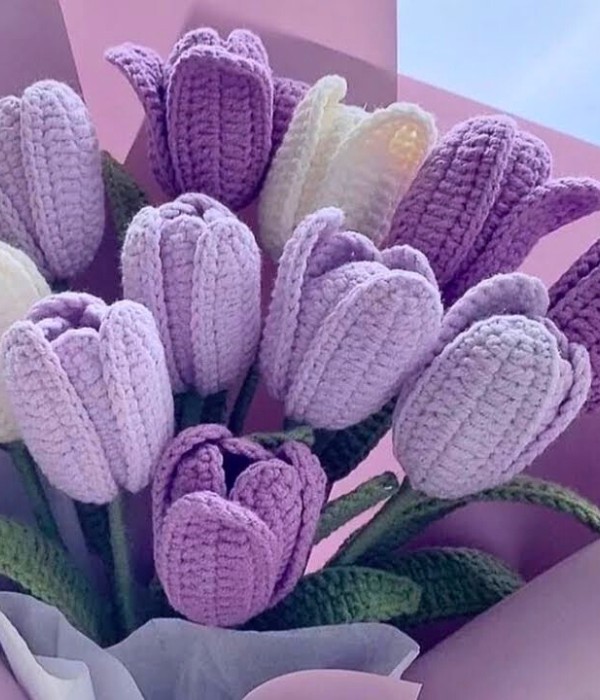
With just a hook, some yarn, and a sprinkle of patience, you can transform simple materials into an adorable tulip that never wilts. This charming little blossom starts with a basic magic ring and grows stitch by stitch into a cheerful bloom. Sewing the pieces together, you find joy in seeing a realistic tulip come to life in your hands. The customizability is as vast as a wildflower meadow every color you choose carves a unique path for your tulip, making each creation a personal touch in your garden of crochet projects.
Making The Crochet Tulip Flower
Materials Needed:
- Colored yarn for the flower
- Green yarn for the stem (to be covered in a separate session)
- Crochet hook
- Wire for the stem
- Floral craft tape
- Fiber filling
Step by step Pattern
- Start with a Magic Ring:
- Begin with your colored yarn (any color of your choice) and make a magic ring.
- Round 1 – Single Crochets into Magic Ring:
- Work 9 single crochets (sc) into the magic ring.
- Pull the yarn end to tighten the circle.
- Join and Begin the Increase Round:
- Make a slip knot into the very first single crochet you made.
- Chain 1.
- Round 2 – Increasing:
- Work 2 single crochets in each stitch around.
- You should have a total of 18 single crochets by the end of this round.
- Close this round with a slip knot as well.
- Round 3 – Increase and Pattern Formation:
- Chain 1.
- This round involves alternating between making one single crochet in the next stitch, then two single crochets in the following stitch, around.
- There should be a total of 27 stitches by the end of Round 3.
- Round 4 to Round 15 – Single Crochet Rounds:
- Chain 1 and make one single crochet in each stitch around, maintaining the 27 stitches count for each round.
- Continue this pattern until you complete Round 15.
- At the end of each round, make a slip knot at the last stitch, then chain 1 to proceed to the next round.
- Finishing the Tulip Flower Shape:
- After Round 15, pull the yarn tight and cut it, leaving a tail for sewing.
- Use the inside (wrong side) of the crochet piece as the outside (right side) of the flower for assembling.

- Adding Fiber Filling and Sewing the Flower:
- Fill the crocheted piece with fiber filling.
- Use a needle and yarn to sew the flower at the center, pulling tightly to form the tulip shape.
- Secure and hide the yarn ends inside the flower.
- Sewing the Petal Edges:
- Sew the edges of the petals together where necessary to form a crossed petal look.
- Ensure all petals are at the same height for consistency.
- Hide and secure all remaining yarn ends.
- Final Touches:
- Make any required adjustments to ensure the tulip flower holds its shape.
- Hide any loose yarn ends for a neat finish.
This completes your crochet tulip flower following the exact pattern details provided in the video link shared. The process meticulously explains from the start of making the crochet base to finishing touches, ensuring an authentic tulip flower appearance.

Leave a Reply