

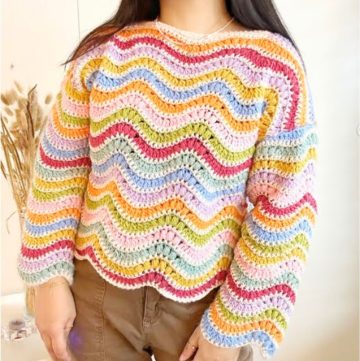
If you enjoy crocheting and wearing your own unique clothes, then you’ll love this Crochet Puff Stitch Sweater/Top Tutorial! It’s a fun project where you start by making a chain as long as half your chest size and then filling it with bouncy puff stitches that feel like tiny clouds.
Crochet Puff Stitch Sweater/Top Tutorial

As you crochet, you’ll see your sweater or top come to life, from the body to the sleeves, and even add a cute lace-up detail at the sleeves for a personal touch. This pattern is super rewarding because by the end, not only will you have learned a cool new stitch, but you’ll also have a cozy and stylish new piece to add to your wardrobe. Grab your hooks and yarn, and let’s make something beautiful together!
Materials
- Yarn: Any yarn of your choice. (I used 600gram light weight yarn)
- Crochet hook: 4.5 & 2.5mm hook
- Measurement tape
- Stitch markers
- Scissors
- Tapestry needle
Optional: Yarn needle
Getting Started
Initial Chain

- Make a slip knot and chain a length that is 17 inches long (or half of your desired bust measurement).
- Single crochet in every chain until the end of the row. You should have a total of 17 single crochets.
Pattern Body
Row 1:

Chain one and turn your work.
- Skip the first single crochet. In the second single crochet space, yarn over and insert your hook, then pull through (you should now have 3 loops on your hook).
- Yarn over again and insert your hook into the same space, pulling through (you should have 5 loops on your hook). Continue this until you have 9 loops on your hook.
- Yarn over and pull through all 9 loops to complete the puff stitch. Chain one to close off the puff stitch.
- Skip the next single crochet and repeat the puff stitch pattern across the rest of the row.
Row 2 and Onwards:

Chain one and turn your work.
- Execute a puff stitch in the first space, following the same pattern as in Row 1.
- Chain one, then continue with the puff stitch pattern throughout the row.
- End the row with a slip stitch.
- Repeat from Row 2 until you reach your desired length for the body of the sweater or top.
Sleeves

Chain one and turn your work.
- Start the row by decreasing the first puff stitch: skip the first space and make a puff stitch in the second space.
- Make one puff stitch in every space until you reach the center of the sleeve, then decrease the next puff stitch in the same manner as before.
- Continue this decrease pattern until you achieve the desired sleeve length.
- For the final rows, chain one and turn, then make a puff stitch in every space across the row.
- Continue until you reach the desired length of the sleeve.
- Attach the sleeves to the main body of the sweater or top by single crocheting them together.
Lace-up Feature

Cut a long piece of yarn and make a slip knot, followed by a few chains.
- Thread this chain through the bottom of the sleeve opening and lace up the sleeve in a crisscross fashion, similar to lacing a shoe.
- Repeat the same steps for the other sleeve.
Finishing Touches
- Chain one and apply a single crochet around the neckline.
- Continue for a few rows to create a clean and neat finish around the neckline.
Your puff stitch sweater or top is now complete! Enjoy wearing your new creation or gift it to a loved one.

Leave a Reply