

The Elizabeth Stitch, often celebrated for its beautiful texture and visual appeal, is a staple in the world of crochet. Its unique construction results in a dense, yet delicate fabric, making it a preferred choice for a plethora of projects such as blankets, scarves, hats, and baby items.

Crochet Elizabeth Stitch Tutorial
The stitch’s distinctive design features a series of crisscrossed loops that create a richly textured surface, inviting to both sight and touch. Its versatility in adapting to various yarn types and colors also allows for creativity and personalization in every piece. For crocheters seeking to add an element of sophistication and texture to their creations, the Elizabeth Stitch offers an engaging and rewarding experience.

Starting the Elizabeth Stitch
- Begin with a chain in multiples of two, then add four additional chains. (Example: Start with 10 chains, then add 4 for a total of 14 chains.)
Creating the First Elizabeth Stitch Row
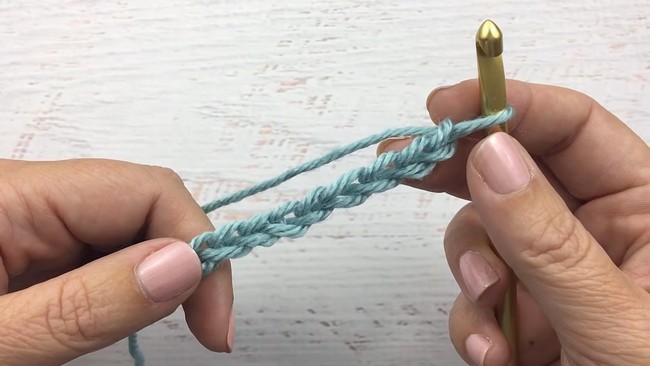
- Start your first Elizabeth stitch in the fourth chain from the hook.
- Insert the hook into the chain, yarn over, and pull through, leaving two loops on the chain.
- Yarn over, insert the hook into the same chain, yarn over again, and pull through until you have four loops on the chain.
- Yarn over and pull through all four loops.
- To complete the stitch, chain one.
Continuing the First Row
- Skip one chain and move to the next chain; repeat the steps for the Elizabeth stitch in the new chain.
- Continue this pattern across the row, finishing with an Elizabeth stitch in the last chain.
- Chain three (to count as the first stitch of the new row) and turn your work.
Creating the Second Elizabeth Stitch Row
- For the second row, look for the two ‘V’s between Elizabeth stitches in the previous row.
- Insert the hook into the first V stitch directly below the chain space.
- Repeat the steps to create an Elizabeth stitch.
- Chain one to complete the stitch.
- Find the next set of two ‘V’s and repeat the steps for the Elizabeth stitch throughout the rest of the row.

Completing the Second Row and Beyond
- When you reach the end of the row, make sure to work the last Elizabeth stitch into the turning chain from the previous row.
- Finish by chaining three and turning your work.
Continuing with the Pattern
- Continue with the pattern, always starting with a chain three (which counts as the first stitch) and then making your Elizabeth stitches into the first V space right under the chain space of the previous row.
- Work this pattern to the desired length, always working in the first V of the spaces between stitches.

Ending the Tutorial
- The video concludes by showing the completed swatch with the crisscross pattern that is characteristic of the Elizabeth stitch.


Leave a Reply